Lets Blogging Make Money

Prevent Chrome from Reloading tabs when Switching back to them

In the Chrome stable version 48, the Chrome team introduced a new feature called Tab Discarding. If you have several tabs open in Chrome, and you don’t visit a tab for a long time, Chrome will automatically refresh it when you switch to it later. This doesn’t happen to tabs that you keep visiting after a short duration of time but to tabs that you haven’t visited in a while. According to Google, this has done to make Chrome less RAM hungry. So, when you keep opening new tabs, to keep up with the RAM, being the smart browser, Chrome starts discarding the old unvisited tabs. Chrome also assumes that in the time you opened and then visited the tab, something might have changed on the web page. So, it ensures you always have the latest version of the page.
stop auto refresh chrome
This newly introduced feature makes sense, but this can be a pain for people who want to flip between their tabs for rapid reference, or who otherwise have enough RAM to spare that Chrome never bogs down their computer. Though the Chrome developers are trying to help us free some memory, however, this newly introduced feature totally ruins the tab if you don’t want its contents to refresh due to some reason, for example, a YouTube video you paused at a particular location. You may want to go back to some top headlines on the homepage of a news website which you had glanced at earlier, but as soon as you click the tab, the chrome auto-refreshes the page, updating the headlines. The list goes on and on.
The idea is good, but to me, this newly added feature is unproductive and highly frustrating. This can be a handy feature, particularly for users who have low-end PCs, if users have little control over this. Users should be able to whitelist websites that should not be discarded automatically. Additionally, users should be able to choose when a tab is discarded, i.e., the time period of inactivity that will drop a tab.
Here’s how you can Prevent Chrome from Reloading tabs.

Prevent Chrome from Reloading tabs

  • To stop chrome reloading tabs automatically, open browser and in the address bar, type chrome://flags/.
stop chrome reloading tabs
  • In the search flag box, type tab discarding. Click the drop-down under Automatic Tab Discarding and select Disabled. Restart Chrome.
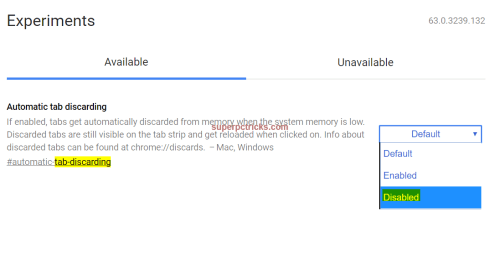
Prevent Chrome from Reloading tabs
Chrome will no longer discard tabs. When you visit a tab after a long time, it will not automatically refresh it.
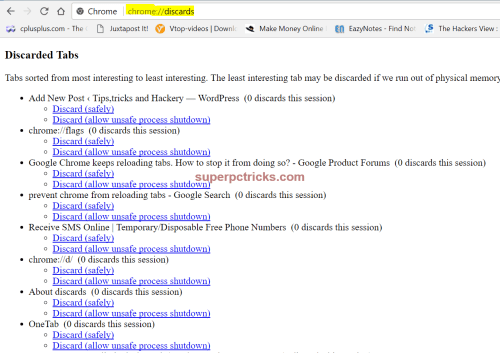
You can also see the tabs discarded by Chrome. To view the discarded tabs, type this in the address Bar: chrome://discards/. This will show all the currently opened tabs and which among those are discarded. You can manually dump a tab by clicking the Discard(safely) button. The tab will not disappear from the browser. Visibly, you won’t see any change when you discard a tab. But, when you switch to the tab, it will load a fresh version of the page. This page also shows the total and estimated free RAM.
chrome keeps refreshing android

Stop Chrome Reloading tabs – Android

You might also face this problem on your Android smartphone while using the Chrome browser for Android. Auto refresh of Chrome tabs usually happens when you switch through tabs, open another app, or just let your phone idle. In the case of Android, there is no such flag to disable the tab discarding feature. So, there is no direct way to disable auto refresh in Chrome mobile browser. This has to do with how Android works as an operating system in general. Android is an operating system that reallocates resources as it sees fit according to the user’s usage habits. This means that if Android sees that you’re spending most of your phone’s processing power and RAM to keep alive the opened tabs, it’ll kill some of your tabs to reserve the memory for other tasks. Since what usually makes your browser refresh the tab is RAM being allocated elsewhere, so avoiding RAM intensive activities while using Chrome should keep your tabs loaded as long as you don’t have too many of them.

Clone Windows 10 to a USB Drive to Boot anywhere

One of the major strength of Windows operating system is its high customizability – you can change how it looks and performs to suit your needs, choose which software you want to use for particular tasks and even set your preferred programs as the defaults. However, if you have to work on someone else’s PC, they will also have it set up according to their likes, which means you’ll have to bear their customizations and selection of applications. It is possible that it may be running the different version of Windows or even a different operating system.
The first solution to this problem that comes to mind is to access your PC remotely, but this means you have to leave your PC turned on and need a high-speed, reliable Internet connection at both ends. A second option is to clone your current Windows installation to a portable USB drive that you can boot into and run from anyplace. In this post, we show you how you can do just that.

Clone Windows 10 to a USB – Requirements

Windows 10 (and also Windows 8,) comes with a feature called Windows To Go, which lets you generate a portable version of the operating system you can operate directly from a USB drive. You just plug the portable drive into a USB port on any PC and boot into it. The first thing you need is an extra USB drive – but not any drive will do because there are some requirements. If you’re merely creating a new Windows To Go installation – that is, a clean version of Windows 10 – the drive you choose need to have at least 32GB of free space. You can use a USB pen drive for this. If, however, you’re cloning your existing Windows 10 installation – the one that is running on your PC with all its programs, customizations, preferences and settings – then you will need a much, much larger drive.
Our Windows installation, for example, is about 432GB in size and even if yours is smaller than this, it’s still likely to be too large for a primary, cheap USB memory stick. So, We recommend you to go with either 512 GB or 1 TB portable hard disk drive to fully utilize the cloning feature of Windows 10. Also, the drive you use should ideally support USB 3.0 or later, unless loading and use the operating system on it will be very slow and unpractical. Bear in mind, too, that not all USB 3.0 drives are similar – You should get the fastest you can find. This means paying a little more money, but the outlay will be well worth it. Ideally, you want your target drive to be around 20%-30% larger than your Windows installation partition.
Finally, you’ll need the free WinToUSB software, which creates the Windows To Go version of your OS on the USB drive. The best thing about this software is that it can hot clone your operating system, which means you can clone your OS while it is running. Before starting the cloning process, you need to carry out a little caretaking of your system.

Performing some cleaning process

First, you should spend some time clearing up as much space as possible. The smaller you can make your current installation of Windows, the faster and smoother it will be to clone it to a USB hard drive, so start by removing any programs you don’t require. A program such as Revo Uninstaller lets you list the items installed on your PC and delete them completely. Get rid of everything that you don’t need, then clean any clutter from your desktop and clear the Recycle Bin. If you have some huge files, such as videos, movies or ISO files, move them to another drive. You can take help of a tool such as CCleaner to go through your hard drive and remove additional clutter.
If you’ve recently upgraded Windows 10 to the April 2018 feature update, you might want to remove your previous Windows installation files because this can free up around 10GB of hard-drive space. There are two ways to do this. The first is to click Start and start typing disk cleanup. When it appears, right-click the Disk Clean-up entry and select Run as administrator. Make sure the partition containing Windows installation files is selected, then click OK. Click the Clean up system files button.
Select Windows installation partition once more and click the OK button again. This time you’ll also see the option – Windows Update Cleanup. This will include the files created by installing a feature Windows Update. Tick that box. Also, tick the Windows upgrade files, and then click OK to get rid of those backup files.
windows clean up
The alternative method is to open Settings and navigate to System, and then Storage. Under Storage Section, click Free up space now. Next, select the Windows Update Cleanup entry, then click Remove files at the top.
disk cleanup windows 10

Formatting your target drive

The drive that you’ll be writing Windows to needs to use the MBR (Master Boot Record) partition format and need to have system and boot partitions. There’s a good chance your drive will use GPT (GUID Partition Table) but changing it to MBR is quite straightforward. The easiest way to do this is to use the EaseUS Partition Master Free. Run the software, locate your drive, right-click it and select Convert GPT to MBR. Click the Apply button at the top to activate the task. If you don’t convert your drive to MBR, you won’t be able to copy Windows to it using WinToUSB.
clone windows 10 to ssd free

The Cloning Process

The cloning operation takes a long time, so for that reason, it might be a good idea to run the cloning process overnight. Exactly how much time you need to wait for its completion will depend on the size of the Windows installation you are copying and the speed of your USB drive. Ours took almost five hours to finish. By default, WinToUSB will shut down your PC once the cloning process completes.
  • Insert the USB drive that you need to install your Windows clone on into a USB 3.0 port and run WinToUSB program. Choose the Physical to USB option on the left. On the right side, the name of the OS you’re running, its version number, and system and boot-partition details are shown.
migrate windows 10 to new hard drive
  • Assuming the details are right, click the Next button. Select the target drive to copy Windows. If there’s more than one drive listed, make sure you pick the right one. You’ll be informed if there’s a problem – for instance, if the destination drive is too small.
windows 10 bootable clone
  • Select the system partition and boot partition in the partition list. Click Next. You’ll be asked to build a WinPE image. Click Yes, wait while this happens, then click Yes to confirm you understand the process will wipe your data. Click Yes again, and your PC will reboot and begin the cloning process.
clone windows 10 to usb
move windows 10 to ssd

Booting from the portable drive

To use the live version of Windows, just plug it into any Computer and boot from it. The PC will need to be set to boot from the bootable USB drive. If it isn’t, you can either select the drive from the boot menu (by pressing whatever key is accepted for this task — typically F8, F11 or F12 key) or configure the boot sequence in the PC’s UEFI or BIOSfirmware. Power up your PC and press the key required to enter setup (normally F2 or Del key), then look for a boot-order menu. Remember to save your changes to make it work.

Create a fresh portable version of Windows 10

If you prefer, you can use WinToUSB to build a fresh Windows 10 installation on a USB drive, then customize this according to your preferences. For this, you need an image of the operating system in ISO format, which you can obtain using Microsoft’s Media Creation Tool. Select the option to create installation media for another PC, click Nextand select the required Windows edition, language, and architecture (32-bit or 64-bit). Everything needs to match with Windows license you have. Click Next and choose the ISO file as your installation media. Click Next again to download the ISO file. The ISO files are large, so it will take a while to finish, depending on your Internet connection speed.
clone windows 10 to ssd free
Once it’s downloaded, run WinToUSB, pick Image to USB option on the left and browse for the ISO in the Image File box. Choose the Windows version, click Next, and select a target drive. Before the process begins, you need to format the drive. Choose the format type you require (MBR for BIOSGPT for UEFI or MBR for UEFI and BIOS ). Once that’s done, follow the steps and create your Windows To Go version of the operating system.

How to Create an Encrypted USB drive

It’s a good idea to encrypt your important files to protect them from hackers and others who use your computer. If you store sensitive data on a USB stick, you should consider using encryption to guard the data in case of theft or loss. There are more than one way and many different tools to create an Encrypted USB drive. In this article, we are going to share the best tool to encrypt files on your USB stick. Veracryptis a superb free tool that lets you encrypt your USB stick with a password. Once you’ve done that, your USB stick will appear empty to anyone who tries to access it. We’ll show you how to encrypt your USB stick, then decrypt it to obtain your files.
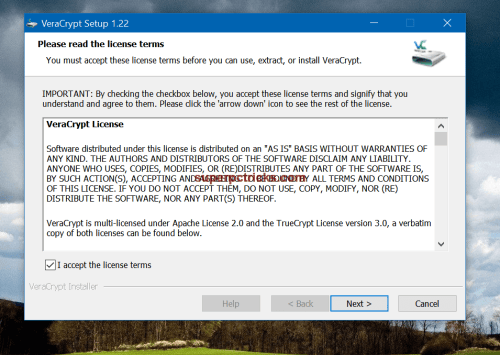
Insert your USB drive into your computer and remove its data, or move it to your PC for now. Open My Computer and make a note of the USB stick’s drive letter because you are going need this later. To install VeraCrypt, go to VeraCrypt download page, then click the Windows download link at the top. Open the downloaded setup file, click Yes, tick to accept the terms and conditions. Click Next twice, then click Install. The application automatically creates a system restore point when you install it.
flash drive encryption software
credit:superpctricks.com
When you see the VeraCrypt has been successfully installed message, click OKFinish, then OK again (to jump the tutorial and close the program’s setup window). Next, right-click VeraCrypt’s desktop icon, click Run as administrator, then click Yes to open it. You’ll see a list of drive letters in the main window. First, click Create Volume. In the window that opens, select Encrypt a non-system partition/drive, then click Next.
encrypt usb drive linux
credit:superpctricks.com
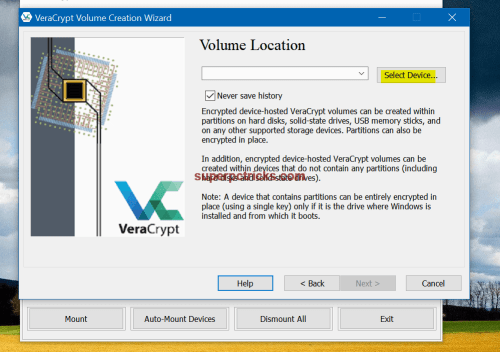
On the next screen, select Standard VeraCrypt volume, then click Next. Now click the Select Device button. You’ll see a list of all your PC’s drives including any removable ones that are connected to your PC. Select your USB stick, Click OK, then Next. On the following screen, select Create encrypted volume and format it, then click Next again.
encrypt a flash drive without software
credit:superpctricks.com
encrypt a flash drive
credit:superpctricks.com
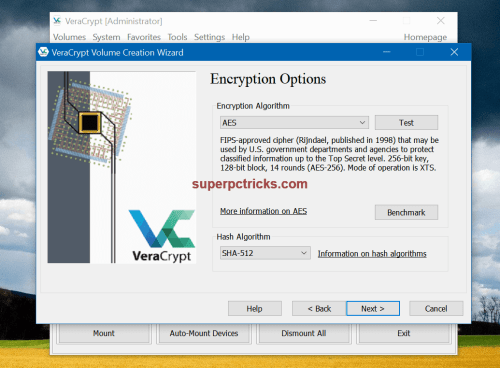
On the Encryption Options screen, you can adjust your encryption levels using the Encryption Algorithm and Hash Algorithm drop-down menus. The former has ten options you can pick from, and the latter has four. We believe the default encryption levels are more than sufficient, so we didn’t change them. Click Next.
encrypt a flash drive without bitlocker
credit:superpctricks.com
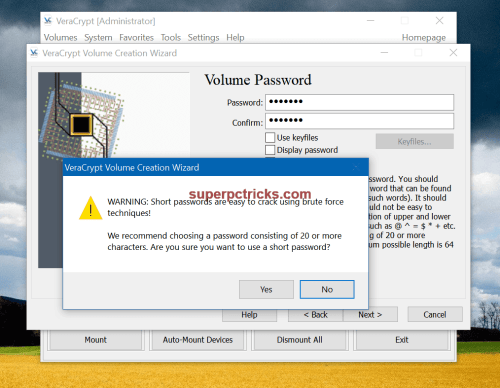
On the Volume Size screen, make sure the size (in bold letters) matches the storage on your USB stick, then click Next. Now type and confirm the password you want to use to decrypt your USB stick. VeraCrypt suggests a password containing 20 or more characters, but make it memorable because there’s no way to decode your data if you forget your password. Tick Display password if you want to make a note of it, then click Next. You’ll see an alert message if your password has fewer than 20 characters. Click Yes if you want to use it anyhow. Alternatively, click No to strengthen it, then click Next.
encrypt a flash drive mac
credit:superpctricks.com
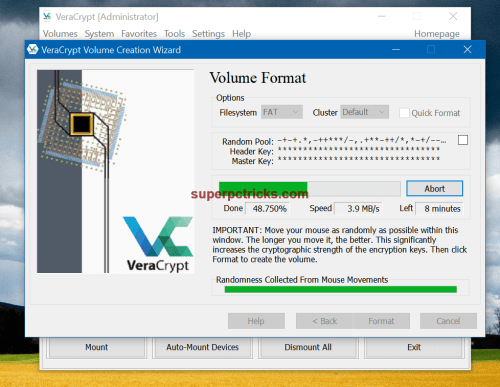
In the Large Files section, you can select whether you want to store large files (above 4GB) on your encrypted drive. Select Yes or No, then click Next. In the Volume Formatsection, you are prompted to move your mouse randomly within the window. This movement will strengthen your encryption level, shown by the progress bar which fills as you move your mouse. Leave the other values as they are. When the bar reaches the end, click Format, then click Yes to confirm.
encrypt a flash drive windows 10
credit:superpctricks.com
VeraCrypt will begin formatting your USB stick. You’ll see its advancement with the estimated time remaining in the field below. The process can take several minutes depending on the size of your USB drive (it took us 15 minutes to format a 4GB USB stick). After that’s done, you’ll see a message informing you that you cannot use the original drive letter that was used for your USB stick. Click OK twice, click Next, then close the program to finish your setup. Your drive is now encrypted and it can be accessed only through the password.
encrypted usb drive
credit:superpctricks.com
encrypt usb drive windows 7
credit:superpctricks.com
Now re-open VeraCrypt, select a drive letter for your formatted USB stick (not its original letter), click Select Device, choose your USB stick, then click OK. Next, click the Mount button, type the password you created, then click OK. When the pop-up window disappears, your USB stick is ready. Close the program, open My Computer, and you’ll see the drive letter you chose. Click it twice to access your USB stick.
un-encrypt a flash drive
credit:superpctricks.com
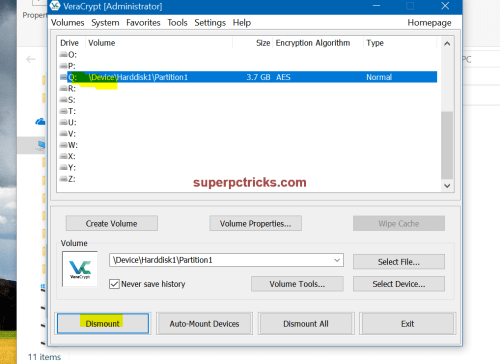
When you’ve finished working from your USB stick, open VeraCrypt, click to select the drive letter you chose in above step, Click Dismount, then Exit to close VeraCrypt. Now open My Computer on your PC. You’ll see your USB stick listed under its original drive letter, but you won’t be able to access it. If you try to open it, you’ll see a message saying the drive is empty. Disregard any messages to format your drive (it’s how VeraCrypt disguises your USB stick). Remove the USB stick if you no longer need it.
usb drive encryption software
credit:superpctricks.com
how to encrypt a flash drive
credit:superpctricks.com
From now on, Ignore any pop-up messages whenever you insert the USB stick into your PC. To decrypt your USB stick, repeat the instructions in above step -open VeraCrypt, select any drive letter you want (besides its original drive letter), click Select Device, select your USB stick, then click OKMount, enter your password, then click OKagain. Now open My Computer. You’ll see the drive letter you selected and a dummy drive. Open the former to access the contents of your USB stick. Repeat the above to encrypt your USB stick when you’ve finished. Your files will now be secure from hackers and snoopers.
encrypt usb drive
credit:superpctricks.com
If you want to decrypt the USB drive permanently, click the Volume Tools option and select Permanently decrypt. Make sure you have emptied the drive before decrypting it permanently(including hidden files). It will take almost the same time to decrypt the drive(permanently) as it takes for the encryption process.
decrypt an encrypted usb drive
credit:superpctricks.com

How to Beat Your Competition at SEO

Search engine optimization (SEO) is a never-ending race. Indeed, you must be willing to try different ways of beating your competition to maintain a high rank. To be on the winning side, you may want to consider the following tips:

Always Create Fresh Content

The quality and quantity of content in your website is vital. It is indicative that you are active and serious about your venture. The search engine will always favor such sites. More so users are likely to share the content, which in turn leads to an increase in external backlinks. How do you determine the ideal quality of content? Well, it is determined by your capacity to understand the target audience’s concerns and needs. You can hence creatively address them on a regular basis. A search for the information on top-ranking websites and social media accounts will help you through.

Track Your Competitor’s Activities

It is acceptable to know who your competitors are and tracking their activities in SEO. They are likely to be doing the same thing to remain on top. Find out if they are making different choices in regards to their content or keywords. You should also try to navigate through their website and determine whether the speed and experience are remarkable. As you go through this, find out if there is something you can do differently on your site.

Choose Your Keywords Wisely

Use of keywords is an important part of SEO. It helps the audience to track your content. Initial research in the Google analytics will help you to come up with a list of keywords relevant to your site. Nonetheless, you must be careful to find keywords that your competitors are not using yet are important to the audience. One of the best strategies to consider is to create variations that widen the search or narrow it down to a local level.

Be Informed About New SEO Rules

SEO is a dynamic field, with new rules, tools, and techniques being introduced regularly. Being on top of the news will help you to come up with a unique strategy to beat your competitors. You can find such information on Google and check bulk rank tracker at serpbook.com

Participate In Forums

You will beat your competitors by participating in forums relevant to your industry for two major reasons. First, you have a chance to post links back to your page effortlessly. It is important to come up with meaningful and engaging ways of participating. You want to avoid being marked as a spammer at all costs. In this background, always go for topics and issues that you truly care about. Second, participating in forums helps you to build an online community. People who go for such discussions may not be interested in social media discussions. They need professional advice in a specific area. You have a chance to reach out to them and hence beat a competitor who has not yet been established as an expert in their field.

Come Up With Informative and Important Videos

The online community is fascinated by interesting videos. They are likely to share them more than articles or links. Take time to find ways of presenting the information on your website in the form of a video. You can come up with testimonials of a product advertised on a company’s site and link the video back to your site. Still, you can request clients to post videos on an issue of concern in a given time. Keep adding the videos to build a huge following in both the social media and on different sites. The search engines will eventually notice these efforts.

Manage Your Listings in Local Directories

If your business depends on local website traffic, it is important that you start to manage your listings. It involves claiming your page on many outlets such as Yelp and TripAdvisor. Fill in as much information as possible so that potential clients can locate you easily. It is inclusive of your name, location, and phone number. Consistency is important because a single client may be seeking for information in different directories. Further, inspire the clients to offer reviews on your service or product. It will encourage others to find you.

Avoid Tricks

Search engines dislike and punish website owners who try to trick their way to the top. While following the right path is challenging, it will pay eventually. Avoid overstuffing your website with keywords and instead, find the right keywords and use them minimally. Further, don’t pay for positive yet fake reviews. You will cripple your chances of getting a good rank. It is also wise to choose SEO experts wisely. Some of them are fond of using tricks in the bid to get quick money from you.
Certainly, you can beat your competitors if you put sufficient time, effort, and creativity in building and optimizing your site. An extensive search on the right content, keywords, and techniques is vital in this journey.